


Taking a screenshot on a Chromebook is quick and easy. Chromebooks use built-in tools from Google, so no extra apps are needed. These steps work on most models in 2026, including student, work, and home devices.
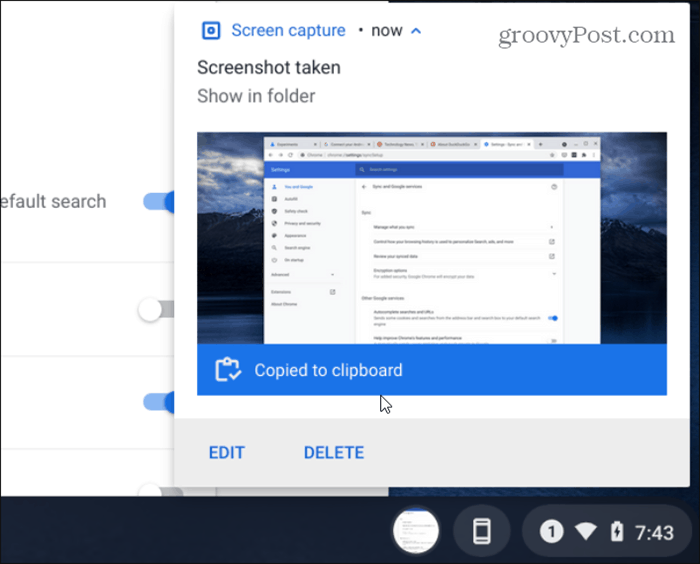
The screen flashes briefly when you capture, and a small notification appears in the bottom right corner. Your screenshot saves automatically as a PNG file in the Downloads folder.
Here are the main ways to do it.
1. Quick Full-Screen Screenshot (Fastest Method)
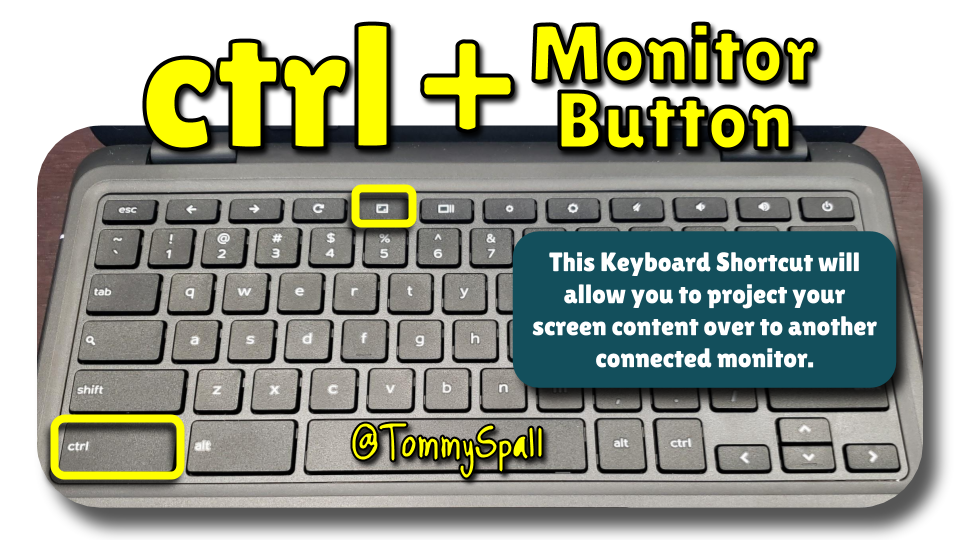
Press these two keys together:
- Ctrl + Show windows
The Show windows key is usually in the top row. It looks like a rectangle with two vertical lines on the right side (sometimes labeled as a square with lines).

Your screen flashes white, the notification pops up, and the full image saves right away.
This is the go-to shortcut for most people.
2. Partial Screenshot (Capture Only Part of the Screen)
Use this when you want just a section, like a specific paragraph or image.
Press these three keys at the same time:
- Ctrl + Shift + Show windows

Your cursor changes to a crosshair. Click and drag to select the area you want. Release the mouse or trackpad to capture.
The screen flashes, and it saves to Downloads.
3. Use the Built-in Screen Capture Tool (More Options)
This method gives you choices without remembering shortcuts.
- Click the time/clock in the bottom-right corner to open Quick Settings.
- Look for the Screen capture tile (it looks like a rectangle with a circle or camera icon).
- Click it to open the toolbar at the bottom of your screen.
![2023 Guide] How to Take a Screenshot on a Chromebook with Ease - Awesome Screenshot & Recorder](https://awe-pub.s3.amazonaws.com/blog/image/chromebook-screen-capture-toolbar-1677554552858.png)
![2023 Guide] How to Take a Screenshot on a Chromebook with Ease - Awesome Screenshot & Recorder](https://awe-pub.s3.amazonaws.com/blog/image/chrome-quick-settings-screen-capture-1677554551778.png)
- Choose Screenshot (the camera icon).
- Pick one:
- Full screen
- Partial (drag to select)
- Window (click a specific window)
- Click Capture or take the shot.
Some newer Chromebooks have a dedicated Screenshot key (a camera icon key). Press it alone to launch the tool directly.
Where to Find Your Screenshots
- Open the Files app (click the launcher circle in the bottom-left → search “Files”).
- Go to My files → Downloads.
- Look for files named like “Screenshot 2026-02-16 at 10.17.00.png”.
- You can rename them, move to Google Drive, share via email, or paste into Google Docs.
Click the notification that appears after taking one—it often says “Screenshot taken” and has a “Show in folder” option.

Extra Tips
- Tablet mode (if your Chromebook flips or detaches): Press Power button + Volume down for a full screenshot.
- Screen recording: Use the same toolbar—select the video icon instead of screenshot.
- If nothing happens: Make sure your Chromebook is updated (Settings → About Chrome OS → Check for updates). Rarely, managed school devices block some features, but basic screenshots usually work.
- Copy to clipboard: In the Screen Capture tool, turn on “Copy to clipboard” for quick paste into documents.


