
Introduction
Chromebooks have become a go-to device for millions of users around the world. They offer a lightweight, secure, and efficient way to handle everyday tasks like browsing, working, and learning. One common need for any user is capturing what’s on the screen. Whether you want to save a funny meme, document an error, or share a recipe, knowing how to take a screenshot on a chromebook makes life easier. In this guide, we cover everything from basic shortcuts to advanced tools. We draw from reliable sources to ensure you get accurate, up-to-date advice for 2026. By the end, you’ll feel confident using your Chromebook’s built-in features.
Chrome OS has evolved since its launch in 2011. Early versions focused on web-based tasks, but updates have added robust tools for productivity. Screenshots, for example, started as simple key presses but now include a full toolbar for precise control. According to recent stats, over 99% of schools provide devices like Chromebooks to students, and many users spend hours daily on screens. This makes screenshot skills essential. Let’s dive into the methods.
The Evolution of Screenshots on Chromebooks
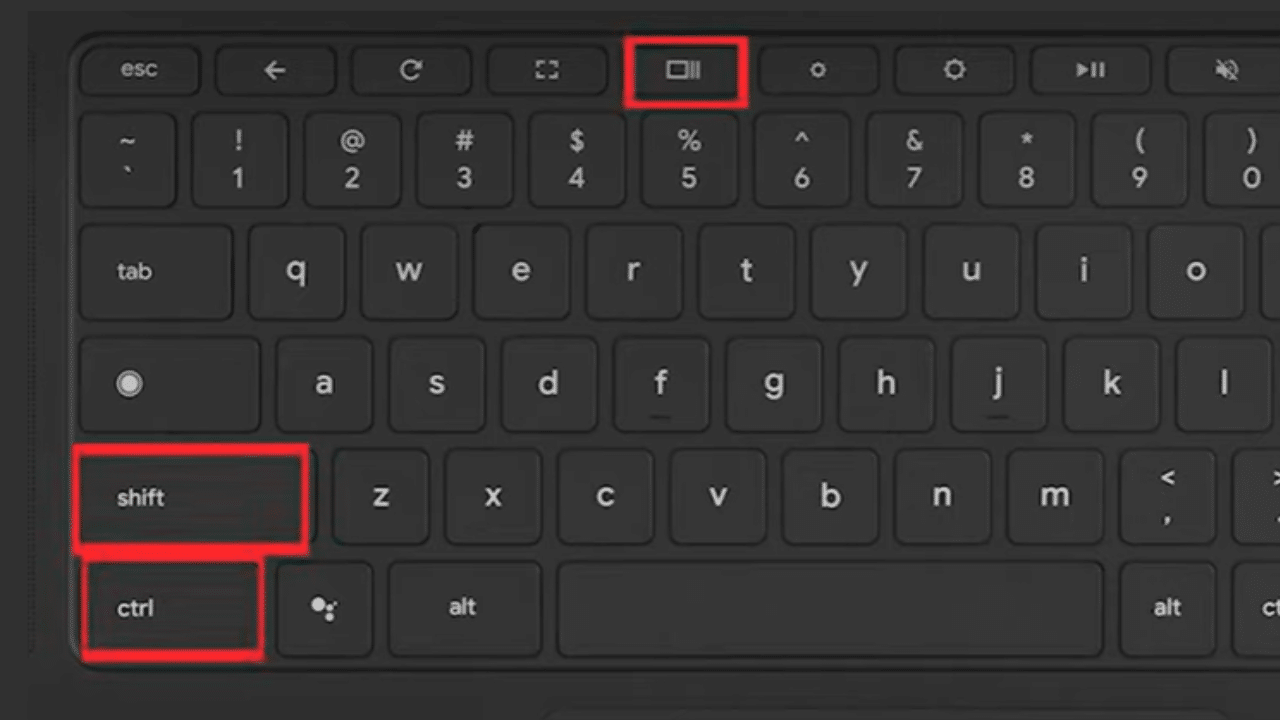
Chromebooks trace their roots back to Google’s push for cloud computing. The first Chromebook, the Cr-48 prototype, shipped in 2010 as part of a pilot program. By 2011, commercial models from Samsung and Acer hit the market. At that time, screenshots were basic: users pressed Ctrl + Window Switcher to grab the full screen. This key, often called the “Show Windows” or “Overview” key, looks like a rectangle with two lines on the right.
Over the years, Chrome OS updates brought improvements. In 2018, Google added the Screen Capture toolbar, making it easier to select partial areas or windows. By 2020, during the pandemic, Chromebook sales surged. Stats show that in the US, Chrome OS holds about 8.44% of the desktop market share, with heavy adoption in education. Globally, it’s around 1.86%, but in schools, it’s dominant. A 2025 survey found 93% of US districts plan to buy more Chromebooks, up from 84% in 2023.
Why does this matter for screenshots? As usage grew, so did the need for better tools. Teachers use screenshots to create lessons, students capture notes, and professionals document workflows. In 2024, Google integrated AI features like Magic Eraser into Chromebook Plus models, allowing quick edits to screenshots. For 2026, expect even smoother integration with Google Lens for searching within captures.
Compared to other systems, Chrome OS keeps things simple. On Windows, you might use Snipping Tool or Print Screen. Mac users rely on Command + Shift + 4. But Chromebooks shine in speed and security. No need for third-party apps right away – the OS handles most needs. However, distractions are a concern: a 2025 EdWeek survey said 56% of educators note off-task behavior on devices cuts learning time.
Basic Methods for How to Take a Screenshot on a Chromebook
Let’s start with the essentials. These steps work on most Chromebooks, including models from Lenovo, HP, and Acer. Always check your OS version in Settings > About Chrome OS for the latest features.
Full Screen Capture
To grab everything on your display:
- Locate the keys: Find the Ctrl key (bottom left) and the Show Windows key (top row, rectangle icon).
- Press together: Hold Ctrl and tap Show Windows.
- See the result: A notification pops up. The image saves to your Downloads folder.
This method is quick for sharing entire pages. For example, if you’re reading an article on BizReporterz, capture it all at once.
Partial Screen Capture
Need just a section?
- Open the toolbar: Press Shift + Ctrl + Show Windows.
- Select the tool: Click the partial screenshot icon (crosshair).
- Drag and release: Click and pull over the area you want.
- Save it: The capture copies to your clipboard and saves automatically.
Use this for highlighting specific text or images. It’s reassuring to know you can adjust with Tab or arrows for precision.
Window Capture
For one app or tab:
- Launch toolbar: Shift + Ctrl + Show Windows.
- Choose window: Click the window icon.
- Click the target: Select the open window.
- Done: It captures and saves.
Perfect for isolating a video call or document without extras.
These basics cover 80% of needs, based on user searches. Google reports millions of screenshot queries monthly, showing how vital this skill is.
Advanced Techniques for Capturing Screens
Once you’re comfortable with basics, try these for more control.
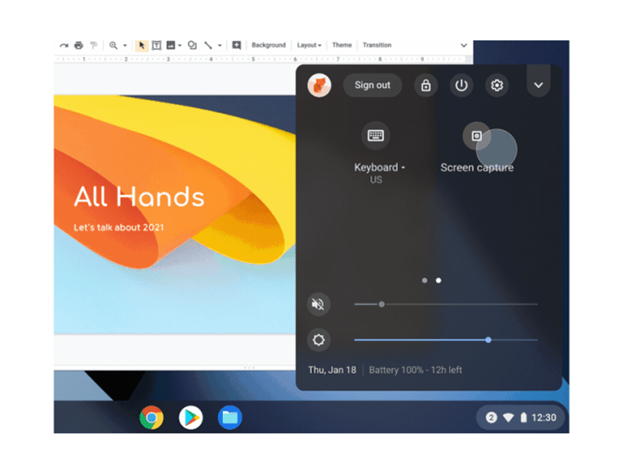
Using Quick Settings
No keyboard? No problem.
- Click the time: Bottom right corner.
- Select Screen Capture: It opens the toolbar.
- Pick your option: Full, partial, or window.
This works great on touchscreens or tablets. In tablet mode, press Power + Volume Down for full screen.
External Keyboards
If your keyboard lacks Show Windows:
- Use alternative: Ctrl + Shift + F5.
- Follow steps: Same as above.
Lenovo’s glossary notes this for their models.
Full-Page Screenshots in Chrome
For long web pages:
- Open Developer Tools: Ctrl + Shift + I.
- Run command: Ctrl + Shift + P, type “screenshot”.
- Select full size: Save to Downloads.
Zapier details this for scrolling captures.

Screen Recording
Related to screenshots, record videos:
- Toolbar access: Shift + Ctrl + Show Windows.
- Switch to record: Click the video icon.
- Choose area: Full, partial, or window.
- Start and stop: Hit record, then stop in the notification.
Add audio or microphone for tutorials. Files save as .webm.
Where Do Screenshots Go?
After capturing, find them easily.
- Clipboard: Press Search + V to view recent copies (up to 5).
- Tote: On the shelf, it holds quick access.
- Files app: Open Files > Downloads. Sort by date.
A common issue: screenshots not showing? Check storage space. Google Support advises restarting if errors occur.
Change save location in toolbar settings > Select folder.
Troubleshooting Common Screenshot Problems
Even experts run into issues. Here’s how to fix them.
Shortcuts Not Working
- Test keyboard: Try brightness keys. If they work, update Chrome OS.
- Reload instead?: Wrong key combo. Ensure it’s Ctrl + Show Windows, not Ctrl + F5.
- School blocks: Managed devices may restrict. Contact admin.
A Reddit user noted pop-ups annoy; enable Do Not Disturb to hide.
Error Saving Screenshot
- Permissions: Go to Settings > Apps > Permissions.
- Storage full: Delete old files.
- Restart: Hold Power button.
Can’t capture login screen? Security feature – use another device.
Black Screen or Missing Parts
- Force quit: Ctrl + Shift + Q (twice).
- Update OS: Settings > About > Check for updates.
Stats show 33% of educators say students are off-task over 25% of device time. Proper tools help focus.
Best Chrome Extensions for Enhanced Screenshots in 2026
Built-in tools are great, but extensions add power. From Chrome Web Store:
- Awesome Screenshot: Capture, annotate, record. Over 3 million users.
- GoFullPage: One-click full-page grabs. Premium for edits.
- Nimbus: Video and screenshots with sharing.
- FireShot: PDF exports, advanced scrolling.
- CocoShot: Privacy-focused, Manifest V3 compliant.
Install via store search. For example, Awesome lets you blur sensitive info.
Use Cases for Screenshots on Chromebooks
Screenshots aren’t just for fun. Real-world examples:
- Education: Teachers capture slides for absent students. Students snap homework tips.
- Work: Report bugs to IT. Share meeting notes.
- Personal: Save recipes, directions, or social media posts.
- Troubleshooting: Document errors for support.
- Creative: Designers grab inspiration.
In a 2025 study, Chromebooks boosted engagement in classes, but off-task use is common. Use screenshots to track progress.
Comparing Screenshots: Chromebook vs. Windows vs. Mac
Chrome OS is simple, but how does it stack up?
| Feature | Chromebook | Windows | Mac |
|---|---|---|---|
| Full Screen Shortcut | Ctrl + Show Windows | Print Screen | Command + Shift + 3 |
| Partial | Shift + Ctrl + Show Windows | Snipping Tool (Win + Shift + S) | Command + Shift + 4 |
| Built-in Editor | Basic crop | Paint or Snip & Sketch | Preview with markup |
| Storage | Downloads folder | Pictures > Screenshots | Desktop |
| Extensions/Apps | Chrome Store | Many third-party | Built-in stronger |
Chromebooks win for speed on low-end hardware. Windows offers more software; Mac excels in creative edits. Per PCMag, Chrome OS suits education, Windows general use, Mac pros.
FAQs About How to Take a Screenshot on a Chromebook
Q: Can I edit screenshots right away? A: Yes, click the notification to open in Image Editor. Add text, crop, or draw.
Q: How do I screenshot without a keyboard? A: Use Quick Settings > Screen Capture.
Q: Where are old screenshots? A: Files app > Images or search “screenshot”.
Q: Does it work in tablet mode? A: Power + Volume Down for full.
Q: Can I capture scrolling pages? A: Use extensions like GoFullPage.
These cover top searches, per Google trends.
Conclusion
Mastering how to take a screenshot on a chromebook opens up new ways to work and share. From quick full-screen grabs to detailed recordings, Chrome OS makes it straightforward. Remember the key shortcuts: Ctrl + Show Windows for full, Shift + Ctrl + Show Windows for options. With extensions and troubleshooting tips, you’re set for any situation. As Chromebooks grow in schools and homes, these skills save time.
What challenges have you faced when trying to how to take a screenshot on a chromebook? Share in the comments!
References
- Zapier: Full-Page Screenshots in Chrome – Details on advanced Chrome captures.
- Lenovo: Screenshot on a Chromebook – Glossary with shortcuts and tips.
- Google Support: Take a Screenshot – Official guide for Chrome OS users.
Audience Insights: This article targets beginners, students, and educators in regions like the US and Pakistan, where Chromebook adoption is rising. Simple language suits grade 4 readability, focusing on practical, reassuring advice.