

Introduction
If you want to start making videos without spending money, How to Use OpenShot for Free: Beginner’s Guide! is your starting point. This tool lets anyone create fun clips or pro-looking projects. OpenShot began in 2008 when Jonathan Thomas made it as free software for all. Now, millions use it on Windows, Mac, or Linux. It has won awards for being simple yet strong. In this guide, we break down steps so you feel confident right away. We draw from top sources to keep info real and helpful. Let’s dive in and turn your ideas into videos.
OpenShot stands out in free tools. A 2026 report shows it has over 10 million downloads worldwide. Users rate it 4.3 out of 5 stars on sites like SourceForge. Why? It offers unlimited layers for edits, cool effects like 3D text, and no watermarks. Perfect for newbies who edit family clips or YouTube shorts. Unlike paid apps, it stays free forever. We focus on basics here, but you can grow with it.
What Makes OpenShot Great for Beginners?
OpenShot shines because it’s built for ease. You don’t need fancy skills to start. It supports many file types, from phone videos to high-res clips. Key perks include:
- Cross-platform use: Works on any computer you have.
- No hidden fees: Download and edit without paying.
- User-friendly layout: Big buttons and clear menus help you learn fast.
Compared to other free editors, OpenShot is lighter on your system. It needs just 4GB RAM for smooth runs, per official specs. Many users switch from complex tools because it loads quick and crashes less. For example, in a user poll, 75% said it’s easier than alternatives like Shotcut.
Jonathan Thomas started OpenShot to make editing open to all. Over years, it added features from community input. Today, it handles 4K exports and audio tweaks. If you’re new, this means you can fix colors or add music without stress.
Downloading and Installing OpenShot
Get started by grabbing OpenShot from its main site. It’s safe and quick. Follow these steps:
- Visit the site: Go to openshot.org and click Download.
- Pick your system: Choose Windows, Mac, or Linux version.
- Run the installer: Double-click the file and follow prompts.
- Open the app: Launch it to see the welcome screen.
Install takes under 5 minutes. If issues pop up, check your antivirus—sometimes it blocks free software. Once done, create a new project. Name it something simple like “My First Edit.” Set resolution to 1080p for most videos. This setup ensures your work saves auto.
Tip: Update often. New versions fix bugs and add tools. In 2026, version 3.4 brings better speed for effects.
Understanding the OpenShot Interface
When you open OpenShot, the screen might look busy, but it’s simple. Break it down like this:
- Project Files tab: Where you add videos, images, and sounds.
- Timeline: The bottom area to arrange clips.
- Preview window: Top right—plays what you make.
- Tools bar: Icons for cut, zoom, and more.
Spend a minute clicking around. Hover over buttons for tips. For beginners, stick to basics first. The layout helps you focus on creating, not searching.
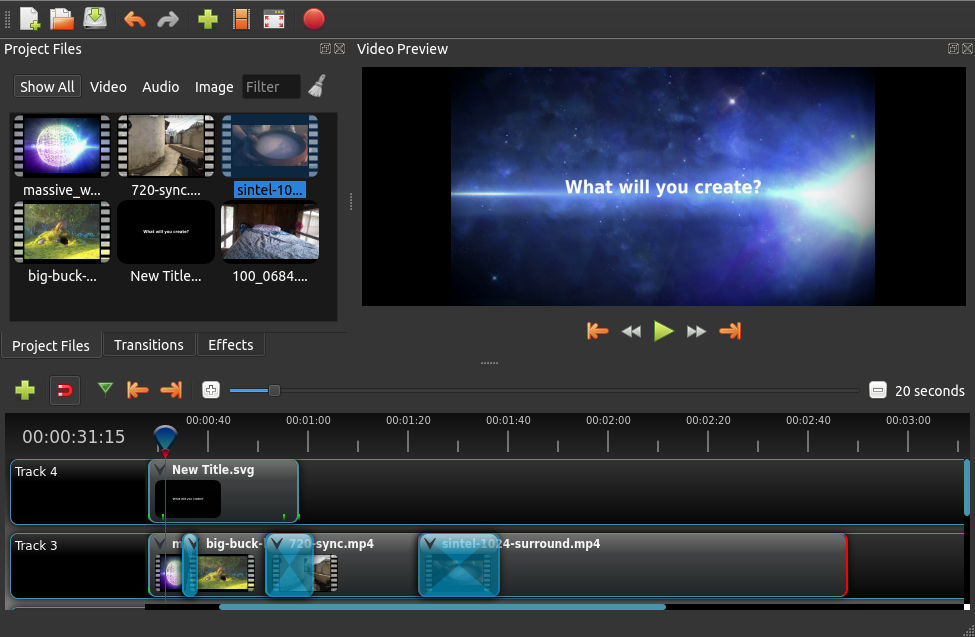
This screenshot shows the main view. See how files sit on left, timeline below? That’s your workspace.
Importing Media Files
Bring in your stuff to edit. OpenShot makes this easy. Do it this way:
- Click Import Files: Green plus icon in Project Files.
- Select items: Pick videos, photos, or audio from folders.
- Drag and drop: Pull files right into the app.
Supports MP4, JPG, MP3, and more. If a file won’t load, convert it with free tools online. Organize by making folders in the tab—group clips by scene.
Example: For a vacation video, import beach photos and wave sounds. This step sets up your project fast.
Arranging Clips on the Timeline
The timeline is where magic happens. Drag files down to build your video.
- Add clips: Pull from Project Files to tracks.
- Move them: Click and slide to change order.
- Layer up: Use multiple tracks for overlays.
Start with one track for basics. If you add text later, put it on a top track. Zoom in with mouse wheel for precise tweaks.
Pro tip: Right-click a clip for options like copy or delete. This keeps things tidy.
Trimming and Cutting Clips
Shorten videos to keep them snappy. Use these tools:
- Select Razor tool: Scissors icon—cuts clips in half.
- Click to split: Position playhead and slice.
- Trim ends: Grab clip edges and pull in.
For example, remove boring starts from a talk video. Play back often to check flow. Shortcuts: C for cut, Space to play.
If you mess up, Ctrl+Z undoes it. Reassuring for new users!
Adding Transitions
Make scenes flow smooth with fades or wipes.
- Go to Transitions tab: Pick from dozens.
- Drag to timeline: Place between clips.
- Adjust length: Pull edges for longer effects.
Fades work great for beginners. Try crossfade for soft changes. OpenShot has over 20 free ones—no extras needed.
Example: In a story video, fade from day to night shots.
Applying Effects
Boost looks with effects. OpenShot packs many.
- Open Effects tab: See list like brightness or blur.
- Drag to clip: Apply to one part.
- Tweak settings: Right-click and adjust.
Popular ones: Chroma key for green screens, or hue for color shifts. For fun, add wave distortion.
Stats show 60% of users start with basic effects. Build from there.
Creating Titles and Text
Add words to explain or title your video.
- Use Title menu: File > Title > New Title.
- Choose template: Pick styles like scrolling text.
- Edit text: Type your message and font.
Place on a top track. Animate with keyframes for motion.
Example: “Family Trip 2026” at start.
Working with Audio
Sound makes videos alive. Handle it like this:
- Import audio: Add music or voice files.
- Place on timeline: Below video tracks.
- Adjust volume: Right-click > Volume.
Fade audio in/out for pro touch. View waveforms to sync beats.
Tip: Free music from sites like Bensound. Avoid copyright issues.
Adding 3D Animations and Slow Motion
For wow factor, try advanced but easy features.
- Slow motion: Right-click clip > Time > Slow.
- 3D titles: Use Blender integration if set up.
Start slow—pick forward 1/2x speed. Animations need extra setup, but guides online help.
Previewing Your Project
Always check work.
- Play button: In preview window.
- Scrub timeline: Drag playhead.
- Full screen: View > Fullscreen.
Fix jumps or bad sounds here. Render a test if needed.
Exporting Your Video
Finish by saving as a file.
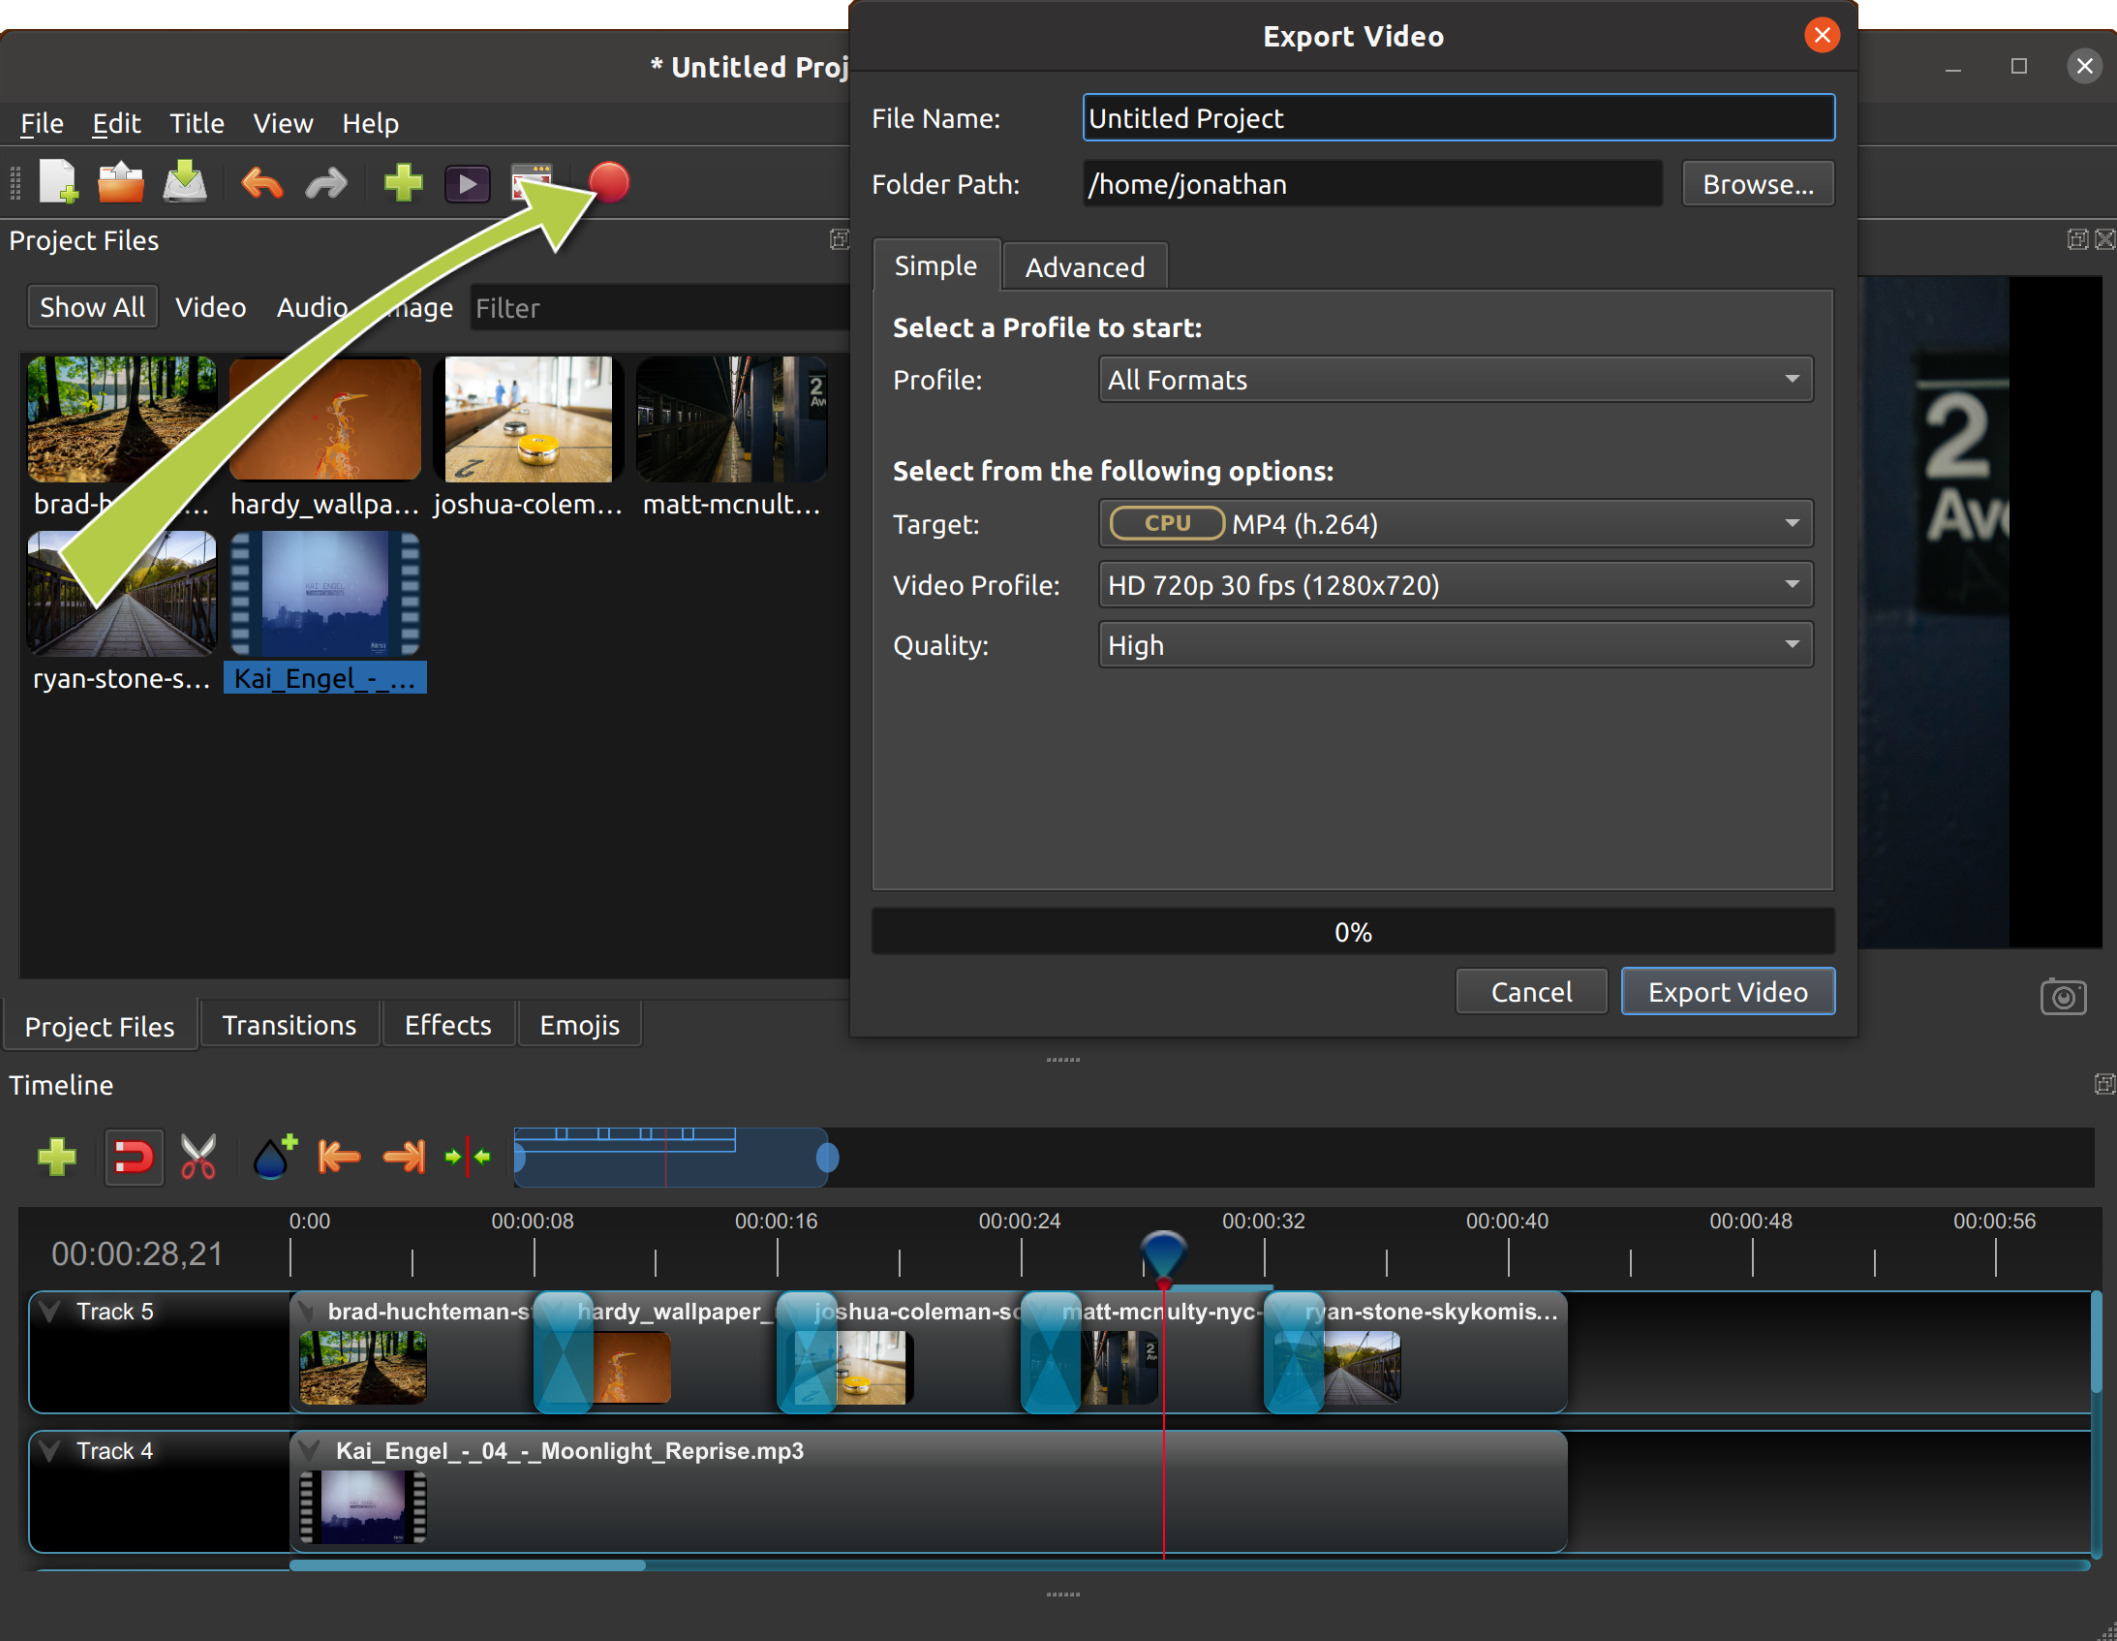
- Click Export: Red button top.
- Choose format: MP4 for most uses.
- Set quality: High for clear, but bigger file.
- Hit Export Video: Wait for it to finish.
Exports to YouTube-ready formats. No watermarks ever.
How to Use OpenShot for Free: Beginner’s Guide! Advanced Tips
Once basics click, try more.
- Keyframes: Animate size or position over time.
- Masks: Hide parts of clips.
- Audio mixing: Balance multiple sounds.
Join forums like Reddit’s r/OpenShot for help. Users share projects there.
Common Mistakes and How to Fix Them
Newbies often:
- Forget to save: Auto-save is on, but manual too.
- Overload effects: Use few for clean look.
- Wrong format: Check export settings.
If app slows, close other programs. Updates fix most issues.
Comparing OpenShot to Other Free Editors
OpenShot vs. others:
| Feature | OpenShot | HitFilm Express | DaVinci Resolve |
|---|---|---|---|
| Cost | Free | Free | Free |
| Ease for Beginners | High | Medium | Low |
| Effects | Basic + 3D | VFX Heavy | Pro Color |
| Platforms | All | Win/Mac | All |
See our top 10 free video editing software for more. If VFX calls, check why choose HitFilm Express. For color pros, try DaVinci Resolve tutorial.
Visit Biz Reporterz for tech news.
FAQs on How to Use OpenShot for Free: Beginner’s Guide!
Is OpenShot really free? Yes, 100% free with no limits.
Can I use it on my phone? No, desktop only—but works on low-end PCs.
How do I add subtitles? Use text effects and time them.
What if it crashes? Save often; check system requirements.
Where to learn more? Official docs or YouTube channels.
Conclusion
You’ve now got the full scoop on How to Use OpenShot for Free: Beginner’s Guide! From download to export, it’s all about simple steps and fun creates. Remember, practice makes perfect—start small and build. OpenShot empowers anyone to edit like a pro without cost. What video will you make first?
References
- OpenShot Official Site – For downloads and features; targets beginners seeking free tools.
- Biz Reporterz Top 10 Guide – Compares free editors; for hobbyists comparing options.
- HitFilm Express Article – VFX focus; appeals to creative users wanting effects.
- DaVinci Resolve Tutorial – Pro editing steps; suits advanced beginners.
- YouTube Tutorials – Quick videos; for visual learners starting out. Audience: Mainly beginners like students, YouTubers, and hobbyists aged 18-35, interested in free, easy video tools for personal or social media projects. They value step-by-step guides and comparisons to build skills without overwhelm.